We were so busy over the weekend, and I was so busy the last couple of days, that I never got a chance to record our progress on the latest project—closing the walls after the first round of AC install.
As recorded previously, I opportunistically ran phone, Cat 5, and coax through the open walls where our contractor ran his electrical wires, the cooling lines from the compressor, and the drip line from the attic. I was originally planning to run speaker wires as well, but Lisa talked me out of it. We will leave audio out of the second floor for now.
We wanted to get the walls closed off, so rather than completing the coax run from the outside drop to the structured wiring box, I moved ahead to installing insulation. After reviewing the options, I reluctantly went with fiberglass — reluctantly because our house’s 2×4 exterior framing only allowed using R-13 batts, and even those were somewhat compressed by the pipes in the wall. But, as Lisa keeps pointing out, it’s better than the horsehair that was there to begin with.
After the insulation, I cut blueboard to size and installed that with drywall screws. Upstairs, I was able to drive the screws directly into studs on both sides. Downstairs the studs were hidden behind the window frame on one side of the opening, but there were still the ends of some laths visible in half the hole. I cut some 3/4″ by 3″ standoffs, nailed those into the studs whereever I had gaps, and then ran the screws through those into the studs (in a few cases, at an angle!) to support the top of the board. It was an ugly process, but it worked well enough, and after the seams and screw holes were taped and the entire thing skim-coated with two layers of veneer plaster, it was OK. (Lisa did the actual plastering, and has concluded that it is the skill most lacking by us for this whole project.)
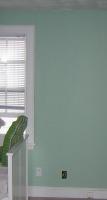
After the plastering was done, I installed the wall plates for the media wiring outlets, which involved terminating each of the cables and snapping the plugs into the modular wall plate. Final steps were priming the plaster and then (finally!) painting the first floor office/bedroom. I took a few photos throughout the process; the one on this entry is a teaser that (with the exception of the uncovered electrical outlet) shows the final product of all the work I just described. The original wall opening ran between the two outlet plates on the wall to within a few inches of the ceiling.
So that was the work on the office this weekend. Plus of course assembling the desk we bought at Ikea. But that’s another story. So is repainting our bedroom, but that story will have to wait until we start it.


