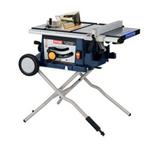
I’d like to introduce you to the table saw on the right, also known as The Machine That Saved My Ass. Ryobi isn’t a lusted after brand of power tools the way Porter and Cable or DeWalt is, but for my money and for today this is the Power Tool That Walks on Water.
Perhaps I should back up. As I previously wrote, we figured out this weekend that we needed to trim most of the lumber we were using to frame the radiator niches so that the wallboard the plasters were to install would be flush with the existing wall surface. Unfortunately, my plan to use a circular saw hit some snags: lack of a good long work surface, inexperience with the tool, and most importantly lack of time. Because I needed to get the niches framed and insulated by Thursday morning, when the plasterers were due to start working. But I was rehearsing Tuesday night, Wednesday morning, and Thursday morning, and singing a concert Thursday night.
So basically I had Wednesday night after an abbreviated work day to rip a sill plate and top plate and studs for five wall openings, then nail them into place and insulate them. I called Lisa and shared the news. She said, “Can you get that done?” I said, “I think I need to get a table saw.” She said, quite reasonably, “But where would you put it?” Right now our garage is full of plumbing fixtures waiting to go in our upstairs bathroom, but it won’t have a lot of room even in the best case scenario. I told her I would find a portable model, and crossed my fingers.
Sure enough, the Ryobi above folds down and even has wheels to roll it away into a corner. It was pretty quick to assemble. I left the office at six, had it in the back seat of my wife’s Prizm (a tight squeeze, but it fit) by 6:40, and was home and assembling it by 7:30. At 8 pm, I connected the ShopVac to the dust port and started ripping lumber, and was done by 9. The ripping process was an absolute breeze.
I started working. The process I followed was to dry-fit the plates and studs, shim or trim where needed, and then start fastening everything together. I nailed the top and sill plates into the framing above the niches and the floor joists, respectively, using a big heavy framing hammer and some 16d nails. (My forearms are still aching, btw). Then I used construction adhesive to fasten the end studs to the finished plaster sides of the niches, and toenailed the center stud into place. I should probably have used more than three studs on some of the openings, but for the sake of time I left some wider bays.
Wednesday night I only finished two bays (and applied the adhesive to the rest) before my body shut down at 10:30. Thursday morning I got up early, insulated the bays in the kitchen and our bedroom, then cursed as I realized I had cut the plates for the living room some six inches two short. I had to leave at that point, so I kept my fingers crossed that the plasterers would not have enough time to address all the openings yesterday.
On the way from the office to the concert I stopped at Home Depot and picked up two more 2x4s, then swung by the house and ripped and crosscut them to fit, and dry fit them in the living room. I was too tired after the concert to do anything else, so I got up this morning and finished nailing and insulating the remaining bays. As I was working on the second to last one, the plasterer arrived, so I hurriedly finished it and moved on to the last bay, where I had to install an electrical box as well as nailing in the framing and insulating the cavity. Somehow I managed it and was out the door at 8, passing the plasterers who were already screwing blueboard over the first cavity.
It was a close thing, and my arms will ache for a week from all the hammering. But I got it done. Thanks, Machine That Saved My Ass! You’ve earned your precious floor space in my garage.

